Tuesday, August 22, 2023

 2023 Update

The reader would be forgiven for thinking I'd been crushed beneath my Spitfire in the driveway almost a decade ago, but the truth is that I got her on the road about on schedule, and enjoyed driving her for several years.  We had to tow her home once for what turned out to be a loose wire in the ignition system, but otherwise she was a pretty dependable car, if a bit loose and prone to leaving a trail of rust flakes and oil drips in her wake.  

I had her all the way up to the Continental Divide (over 10,000 feet, or 3,050 meters) on one memorable occasion, and she behaved herself admirably for that drive and most others.  Then there came a hydraulic problem with the clutch that I couldn't seem to solve... and a divorce....

I managed to roll-start and dry-shift the Spitfire to my new home in 2017.  The next year, I spotted an ad for a very nice orange 1974 Spitfire 1500 with a stuck engine, but no serious rust.  I purchased that car for $800, and began the slow, intermittent process of making one really great car out of the bits of the two.  The original carmine red Spit was sold as a rolling shell with the bad engine from the new car, and after a couple years on hiatus, I'm back at work on the engine swap.  An interior refresh awaits after that.

The goal is to have her on the road again by next spring, 2024 - if not sooner.

Wednesday, January 29, 2014

Bleak Midwinter

Not much happening lately.  We've had a succession of snowstorms that have cut into the available time for the Spit, and what time remains has been further eroded by work responsibilities.  It's hard to work on a car outside, in Colorado, in January.

But I did luck into a warm Saturday last weekend, and took advantage of it to get a little work done.  The new front brake rotors are installed, and, in the process, the front wheel bearings got a good cleaning and a dose of fresh grease.  The hub adjustment process is a bit arcane, and the end float (or bearing play, as I would call it) is a bit different from one side to the other.  I need to grab new cotter pins anyway, so I'll redo the adjustment once I have the new pins, and see if I can get better results next time.

While I was under the hood, I pulled out the battery so that I can begin the assault on the surface rust in the battery tray and the rest of the untreated right side of the bulkhead.  The rust in the battery tray looks significant, but not structural yet.  We'll wire wheel it down to bare metal, hit it with the rust converter fluid, prime, and paint.  I expect the job to stretch over the next couple weeks' worth of stolen winter work sessions.

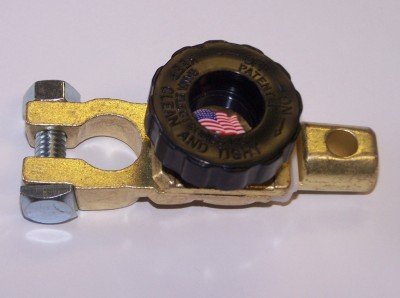
And while I had the battery out, I hooked it up to my battery charger and received an unpleasant surprise.  The battery seems to have drained and been damaged by the cold.  It's not accepting a charge now, which means I probably need a new $75 battery.  And I suppose I also need a battery disconnect switch so it doesn't happen again.  I have one of these on my battered old 4Runner:


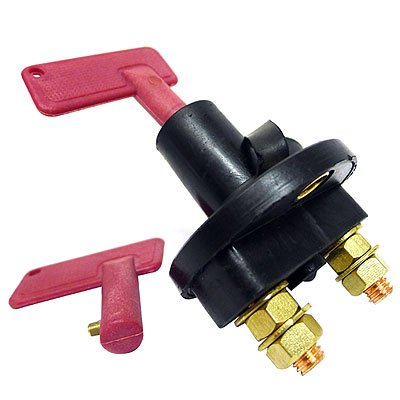
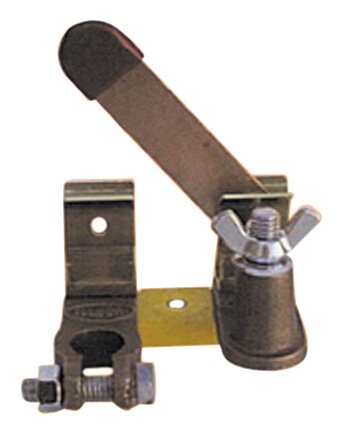
It would be nice to have a switch within reach of the driver's seat, but I'm reluctant to drill new holes through the firewall/bulkhead.  Perhaps one of these two options at right, if I decide the under-bonnet location works. 

Oh, and while I'm listing faulty parts, I noticed that the positive battery clamp is cracked and will need to be replaced.  That's a minor annoyance compared to the battery, but it still adds one more item to the to-do list, which was already frighteningly long.

Friday, January 10, 2014

Paint

My dad called today, and, in the course of describing the progress on the Triumph, I talked myself into not leaving the bulkhead in primer.  When am I ever going to have both master cylinders off again?!  This is a great opportunity to do this right, and the delay is negligible since it's not likely to be Triumph weather until March at the absolute earliest.

So...  where does one find #82 Carmine Red paint?  Well, there are plenty of places on the internet willing to sell you a spray can of it for $25-30 each.  But everybody wanted another $15 for shipping for a single can of spray paint, and several of them auto-added a bunch of other things to your shopping cart, like dust masks and scratch pens and masking tape. The whole thing comes across as kind of a racket.  

None of the big Triumph parts suppliers in the US seemed to want to sell body paint.  They'll all happily sell brake caliper paint, or engine paint, or wire wheel paint, but not the OEM body colors.  Rimmer Bros. (UK) was selling it for GBP 12.50 or so, which is less than $25, but shipping from the UK seems unlikely to make it worthwhile.

On a lark, I called our local British car shop, The Motorway. They recommended a particular paint shop who could mix up matching paint.  So I called them, and found out that #82 Carmine Red corresponds to PPG code # 72065, and they could have a spray can of it mixed up before quittin' time tonight for $15.  Sold.

I'll post some pics of the paint process as it unfolds.  Meanwhile, I'm in the middle of a carburetor rebuild, and I've got brake parts waiting for their turn to get installed.  Need to get cracking....

Thursday, January 9, 2014

Parts!

My order from Victoria British arrived today, containing a front brake parts kit (rotors, pads, hoses, caliper seal set, mounting hardware....) and a pair of motor mounts.  I now have everything needed to complete the brakes, right down to the DOT5 fluid.
We'll get the caliper rebuilds done, and then it's time to install the entire brake system!  Kind of excited to check that off the list.

Friday, January 3, 2014

Brakes


I went after the front brakes a bit more today.  In my last wrenching session, I'd noticed that the hard lines were badly corroded, and that the P.O. had purchased an expensive set of replacement copper hard lines for me.  So with no cost to me, the old lines definitely had to come out - there's visible pitting on the exterior, and who knows whether there isn't similar deterioration on the interior as well?

I removed the scary old lines and set them aside.  Prior experience on other vehicles has taught me that it can be tricky to figure out exactly how the new lines should be shaped, so it's handy to keep the old ones around for reference.
Rusty brake lines... <shudder>

With that done, I turned my attention to the brake rotors (or discs, if you prefer).  Removal involves pulling the front hubs off of their axles, and then working the rotors free of the hubs on the workbench. The hardest step turned out to be removing the grease caps - they're supposed to "tap" out according to the Haynes manual, but I'm not sure how you tap something out when its shape and position leave no way to get behind it.  

Google turned up a Triumph Experience post on this very topic, in which more experienced mechanics basically gave the rest of us permission to do whatever violence was required in removing the things.  Giant pliers?  Sure.  Smack 'em with a hammer until the shape gives you something to grab with giant pliers?  Sure.  Smack the giant pliers while squeezing the cap?  Sure, have at it.

So I had at it.  They came out pretty quickly, with not too much distortion.  Once they were out of the way, it was a simple matter to remove the cotter pin, castle nut, and then pop the entire hub and rotor off.

Even scarier: dry-rotted fuel line,
ready to rupture and spray gasoline
all over the engine bay.
They were in a sorry state, though.  There are four bolts that hold each rotor onto its hub, and they were all a-flower in rust. I hit them with WD-40 and let them sit for a bit.

While the penetrant was penetrating, I took a few minutes to replace some of the old fuel line.  It was badly cracked and dry rotted, a complete liability.  I'd purchased about 8 feet of new line at AutoZone recently, and it went on without any hassle.

Humidity, time and neglect have done a
number on this brake rotor. 
Back to the brakes, I used my trusty pickle fork against the wheel studs as a lever, and the breaker bar in my other hand, and gradually broke free each of the 8 bolts holding rotors onto hubs.  With the bolts removed, there was nothing but rust left holding the rotors on, but the rust had a pretty tight grip.  With the light fading, I hit the edge with WD-40 and began packing up while it soaked in.

Just a little while later, I'd managed to knock both rotors free of their hubs.  Loose now, I tilted them in the glare of the porch light to determine whether they could be saved.  The verdict:  I don't think so.  One disc was pretty badly grooved... before it began rusting.  And both showed heavy pitting from rust on the braking surface.  I'm going to need to replace both rotors, along with the pads and the rubber innards of the brake calipers.  

It's expensive, replacing all of this stuff.  At the same time, though, there's a lot of peace of mind to be had in knowing that I've gone through the entire brake system.  If I can ever get the car rolling, I can at least be confident that it will stop when I ask it to.

As I was putting my tools away, the milkman pulled up.  It's not the first time he's caught me working on the Triumph, and he complimented me on how it's coming.  It's gratifying to know that he sees the progress I'm making - though, as I pointed out to him, that progress is still in the wrong direction:  every day's work finds the car further disassembled, at this point.  Hopefully I can get these brake parts ordered and begin to reverse that trend soon.

Friday, December 27, 2013

Safety Fast


The title of today's post - "Safety Fast!" - comes from Triumph's arch-rival in the British sportscar world, MG.  I've always thought it was a pretty clever slogan.  Performance means safety, they're saying, and they're right.  It's a philosophy that SAAB used to counter Volvo's "Swedish tank" reputation back in the 1980's: the safest accident to be in is the one that never happens, because you had the visibility, agility, power and/or braking to avoid it.

To that end, today's work session focused on a couple of safety-critical systems: brakes and steering.

Tie Rod Ends

The tie rods connect the steering rack to the front wheel assemblies.  The rack slides sideways as the steering wheel is turned; the tie rods translate that horizontal motion into steering motion by push-pulling the hub assemblies, which pivot on the vertical axis, so that the wheels point in your new, desired direction.

The steering rack assembly is mounted firmly to the chassis, while the wheels need to be able to travel up and down on the suspension, so the tie rods incorporate a ball-and-socket joint at either end to permit that movement.    The joints on the outer end of the tie rods are removable, because they tend to get worn and damaged by road debris, heat from the nearby braking surfaces, and the stresses put on them by the steering forces.  Besides, threading the tie rod ends along the tie rods provides the adjustment needed to perform front end alignment.

This old tie rod end was an accident waiting to happen.
Scary!
The tie rod end is protected by a rubber boot to keep the moving parts clean and greasy, the way they ought to be.  Once a tie rod end's boot fails, the surfaces are subject to grit, water, and gradual loss of grease.  Eventually, the cup that keeps the ball from popping out of the socket fails.  When this happens, you'll suddenly lose steering control on that side just after hitting a bump; the two front wheels will point in different directions, and the car will probably end up going straight into whatever is directly ahead,  possibly shedding parts as it does so.

Personally, I hope never to find out what it's like to be in a car when that's happening.  So when I inspected the tie rod ends and found one boot entirely missing, with damage visible to the ball and socket beneath, I figured now was a great time to pop in some new ones.

Luckily, the P.O. had provided spare tie rod ends, as well as spare boots to protect the inner ends of the tie rods.  

New boot and tie rod end in place.
It's a simple enough job.  The tie rod ends themselves are sort of press fit into the tie rod levers on the hubs.  Removing them requires a "pickle fork" - the clever colloquial name for the tie rod end remover.  But I have one of those, and was able to free things up pretty easily.  

Once the old tie rod ends are removed, you can slide the old boots off, slide the new boots on, thread on the replacement tie rod end, and tighten everything down.  You may need to perform an alignment, but that's the extent of the tricky stuff.

Well, except for the fact that the boots are tight, and end up all greasy when you're trying to put them on.  I couldn't for the life of me figure out how to get the things seated.  Vic from the Triumph Experience forum to the rescue: soak the end of the boot in boiling water for a few minutes, so that it will be pliable.  Then you'll be able to stretch it into place better.  I found that, even with the boiling water trick, it took 6 or 8 tries to get it.  But get it I did, eventually.

Then it was a simple matter of getting the new tie rod ends installed.  I showed my boys how to use a torque wrench while we were at it.  

The alignment will wait until we're closer to getting this thing on the road.  But hey, don't let me forget it, okay? 


Front Brakes

Both brake calipers will get wire brushed clean,
overhauled, and painted with caliper paint.  
When the P.O. sold me the car, he described it as "needing rear brakes."  I took this to mean that the front brakes were fine.  But the fact is, they look pretty rough.  The pads looked okay, but the rubber brake hoses are cracked and aged, and the steel brake pipes are rusty.  The disc calipers look weathered, but there were no obvious signs of fluid leaks.

I'm sure there are cars on the road in similar condition, but it would be criminal not to fix the rusty and cracked hydraulic lines while I've got the brake master cylinder out. Luckily, the P.O. provided an expensive set of copper brake pipes with the car.

The brake discs don't show much wear, so I
should be able to just get them machined smooth and reinstall them.
So I disconnected the hoses and took a crack at getting the hard lines free, too.  That might take some doing, as the hard lines are corroded and pretty stuck in their T fittings.  For now, I soaked 'em in WD-40 and let it start to penetrate. 

I'll gradually remove the rusty hard lines and install their shiny copper replacements as I'm able to break things loose.   Meanwhile,  I pulled the calipers off, so while I'm waiting for the WD-40 to do its job, I can clean, overhaul, and paint the calipers.  

And I'll try to get the rotors machined, if they are within specification, or replace them if they are not.  And while I'm doing that I might as well replace the front wheel bearings. And....

That "While I'm at it" phrase is a dangerous one, because "while I'm at it" I might as well strip everything down to bare metal, weld in new rocker panels and floors, and overhaul the engine.  We're trying not to end up there.  But brakes and tie rod ends seem like a no-brainer: I don't want to get this thing running only to run it into a bridge abutment when some critical safety system fails.
Wednesday, December 18, 2013

Rear Window

Last week, the long-anticipated used rear window for my hard top showed up in the mail.  It survived the trip, and was in good shape, though a little dirty.  I cleaned it up and made ready to install it.  I had already received the rubber gasket that surrounds the window, so nothing was holding me back from putting the window in.

To Paint or Not To Paint?


Nothing, that is, except the feeling that maybe I ought to get the hard top repainted while I had the window out.  It's got a spot in the center of the leading edge where the paint has flaked off, exposing bare metal beneath.  I decided to call a few body shops and find out what it would cost to get the top painted.

It turns out that a professional repaint of the hard top would cost around $400-600.  As much as I'd like to do it, that's just not in the budget right now.  I'll have to handle the paint trouble with touch-up paint.  So, armed with that decision, some slave labor from the kids, and a nice warm day to do the work, I went out yesterday to get the window installed.

Installation: The String Method

I've never done anything like this.  I've never even read a how-to about it online.  But I did hear one reference to "the string method" for installing windows, in which the guy mentioned pulling on some piece of string from the inside while his friend pushed on the window from the outside.  That was enough to figure out what to do.
Pull the rope to the right, past the gasket flange
in the hard top, and the gasket will seat correctly.

The gasket had two slots in it.  The one intended for the glass was really deep; the other was intended for the flange in the hard top, and it was significantly shallower.  So I installed the gasket on the window, and got a piece of 1/4" nylon cord that I pressed into the other slot in the gasket, all the way around.  There were two tails left over, sticking out of the gasket in the lower corner.  Out we went to the car.

I'm pulling the string while Calvin...
persuades the gasket to cooperate.
I put the two free ends of the cord into the car, set the window in place, and instructed my biggest, strongest kid to press hard on the gasket right there at that point.  I then pulled on the cord, which peeled the lip of the gasket over the flange as the cord pulled free of the gasket.  Calvin moved his hands to provide pressure at the point where the cord was peeling free from the gasket, and around we went.

There were a couple points where the gasket was really reluctant to cooperate, and I was pulling hard enough I was worried I'd break the skin on my hands.  We took a break, lubed the recalcitrant parts of the gasket with some silicone spray, and I improvised a pulling handle out of a crescent wrench.  Work continued.... and suddenly we were done.  Elapsed time was probably less than 20 minutes.

Ta-da!
The only thing left to do was to press in the decorative silver bead that surrounds the window.  That went even more smoothly, and, for only $275 and 30 minutes of (DIY) labor, the hard top is weather-tight.  It looks pretty darned good, if you ask me.  And now I know how to do it.

Oh, and one more thing:

Never Put Duct Tape On A Car's Finish

When we had a big, windy snow storm bearing down on us, I made the decision to duct tape sheet plastic and plywood over the opening to protect the Spitfire's interior from the weather.  As I did it, I wrote:
When the window arrives, we'll pull this wart off and see what violence the duct tape does to the paint.... 
How prescient.  The duct tape pulled off a couple of large (thumbprint-sized) patches of body paint, and another strip pulled a few smaller spots off.  Once I'm able to get some #82 Carmine Red spray paint, I'll need to do some spot repairs on the paint damage.

Oh, well, it's not as if I could have left the tarp on.  The flapping in the wind caused some paint damage to the driver's side door, too.  Maybe I need two cans of #82 Carmine Red....